## Introduction
EmulationStation is the official graphical frontend of the RetroPie project.
| |
| :---: |
EmulationStation is not an emulator, rather it is a polished game launcher that includes:
- Controller and keyboard support
- Custom themes
- Scraper for box art and game metadata
ES was originally developed by Aloshi (code) and Nils Bonenberger (UI) but, since they have moved on to other projects, the RetroPie project keeps [its own fork](https://github.com/RetroPie/EmulationStation/). That fork has made some improvements like [video support](Scraper.md#scraping-videos), faster load times, favourites, and controller integration among others. Any reference for versions in this doc is related to the [RetroPie's fork](https://github.com/RetroPie/EmulationStation/).
## Enabling Favorites, All Games, and Last Played systems
Since ES version 2.4.0 you can create a list of your favorite games. You can also have a list of all games, and your last played games. These lists are all optional and in the example below we'll see how to enable them.
**Note: In order to use this feature, the theme you're using MUST support it**.
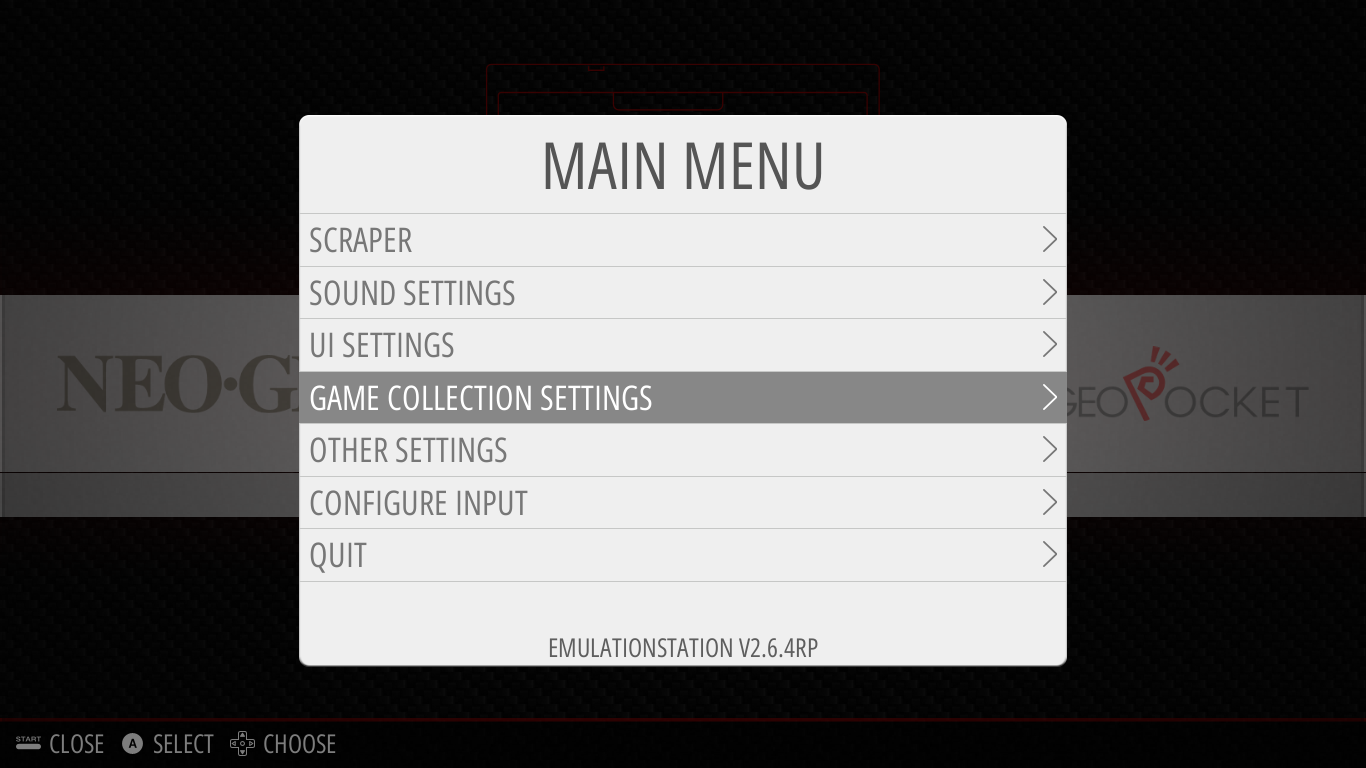
1. press `Start` to access the ES main menu and then select "**GAME COLLECTIONS SETTINGS**".
|  |
| :---: |
2. Next, select the first option: "**AUTOMATIC GAME COLLECTIONS**".
|  |
| :---: |
3. And then mark those you want to enable.
|  |
| :---: |
4. After marking those you want, go back to the default ES user interface. Note that now you have more systems, like in the example below:
|  |
| :---: |
### Adding games to Favorites
It's pretty simple: just move to the game you want to add and press the button you set to be `Y`. Pressing `Y` when the cursor is on a game already present in the Favorites, removes it from the list.
## Custom collections
Since ES version 2.6.0 you can create a custom list of games. You can group games by any category you want. Examples: shoot'em ups, beat'em ups, Street Fighter, RPGs, Batman, TMNT, Mega Man or any other category you can think.
If the name of the collection you're creating matches an unused theme folder, it will be shown in the main carousel as a new system entry. If there's no matching theme folder for the name you selected, it will be grouped under a new "Collections" carousel system entry.
In the example below we'll create a custom collection to group Mega Man games. **Note: You can either choose to create a collection based on an unused theme folder, or if creating from scratch you'll need a keyboard to type the name of your custom collection**.
1. press `Start` to access the ES main menu and then select "**GAME COLLECTIONS SETTINGS**".
2. Select the option "**CREATE NEW CUSTOM COLLECTION**".
|  |
| :---: |
3. An input box will be shown. Type the name of your custom collection.
|  |
| :---: |
4. After typing the name and pressing OK, you're now in a mode where the button you set to be `Y` adds a game to the collection. Look the message on top of the image below. (**Note: while in this mode you can't add games to your favorites**).
|  |
| :---: |
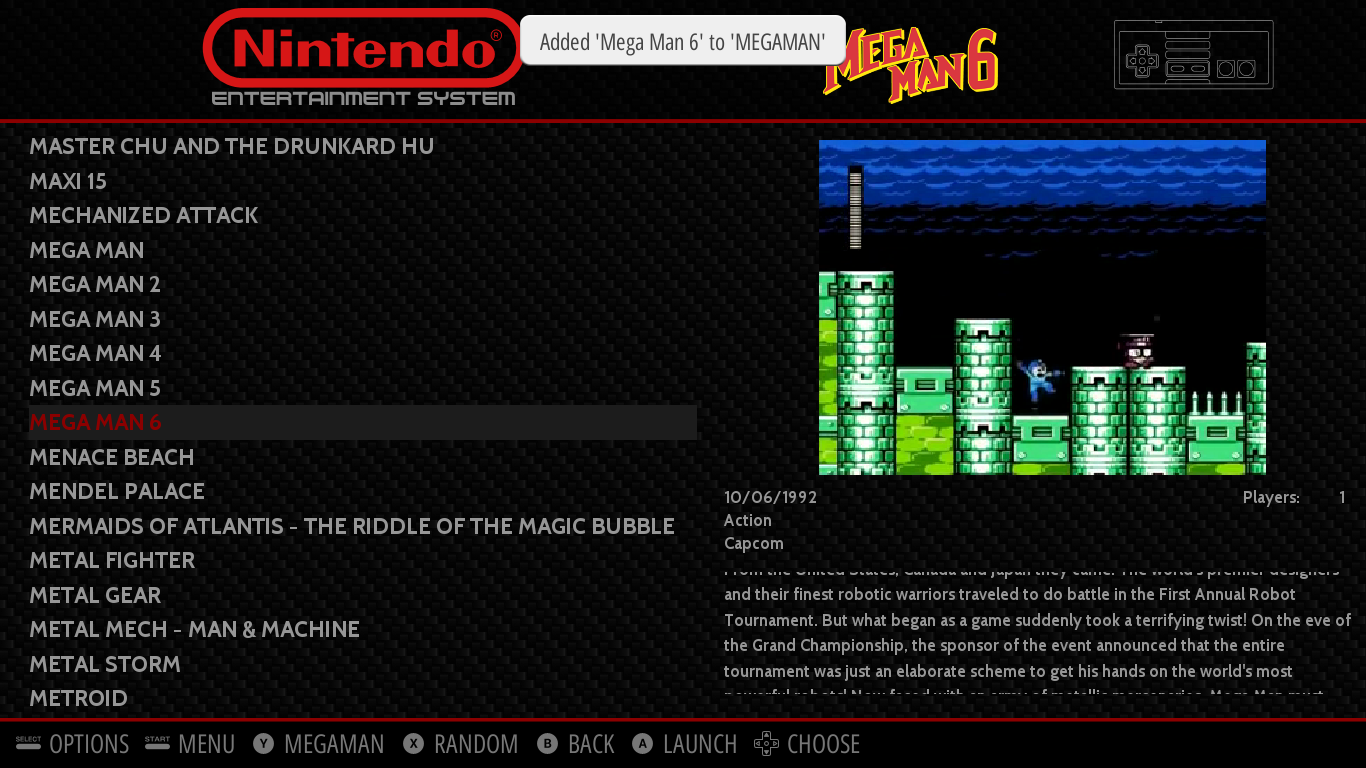
5. Move the cursor to the game you want to add to your collection and press `Y`, just like you do to add/remove a game to Favorites. After adding a game you'll see a message on the top of screen, like in the image below.
|  |
| :---: |
6. After adding the games you want in your collection, you can finish editing the collection by either:
a) going to any game list, pressing `Select` and selecting "**FINISH EDITING 'YOUR CUSTOM' COLLECTION**", or
b) going to "**GAME COLLECTIONS SETTINGS**" menu and then select "**FINISH EDITING 'YOUR CUSTOM' COLLECTION**".
|  |
| :---: |
7. Now go to the "collections system" and you'll see your custom collection.
|  |
| :---: |
|  |
| :---: |
|  |
| :---: |
8. Once you "**FINISH EDITING 'YOUR CUSTOM' COLLECTION**", the `Y` button recover the behavior of adding/removing games to the favorites list. If you want to put ES on "editing custom collection mode" again, go the custom collection game list, press `Select` and then choose "**ADD/REMOVE GAMES TO THIS GAME COLLECTION**".
|  |
| :---: |
## Editing ES Configs
ES uses xml files for its database and caches them on loading and exit, so **any edits to the configuration files will need to be changed when ES is closed.**
Because of the way the RetroPie-Setup script works custom configurations will need to be copied and edited in specific places, otherwise your custom edits would be overwritten anytime a system was updated from the RetroPie setup script.
Note that any configs in `~/.emulationstation/` are symlinked to `/opt/retropie/configs/all/emulationstation/` which means both paths will work.
## Configuration Files
There are different configuration files for the different aspects of EmulationStation:
### Systems
`es_systems.cfg` defines the systems that show up in ES. The RetroPie-Setup script will automatically generate this config file alphabetically when you install any new systems. ES will check two places for an es_systems.cfg file, in the following order, stopping after it finds one that works:
- `~/.emulationstation/es_systems.cfg`
- `/etc/emulationstation/es_systems.cfg`
Example config:
```
nes
Nintendo Entertainment System
/home/pi/RetroPie/roms/nes
.nes .zip .NES .ZIP
/opt/retropie/supplementary/runcommand/runcommand.sh 0 _SYS_ nes %ROM%
nes
nes
```
More information [HERE](https://github.com/Aloshi/EmulationStation/blob/master/README.md#writing-an-es_systemscfg)
#### es_systems.cfg edits
Custom es_systems.cfg should be in `~/.emulationstation/es_systems.cfg`
copy `es_systems.cfg` from `/etc/emulationstation` to `~/.emulationstation`
```
cp /etc/emulationstation/es_systems.cfg ~/.emulationstation/es_systems.cfg
```
Note that anytime you add a new system from the RetroPie-Setup Script you will need to manually copy over the new system to the new location in order to keep parity.
#### platforms.cfg edits
Retropie uses a file called `platforms.cfg` to generate the system configurations for `es_systems.cfg` you can create a custom platforms.cfg to override the default system for regional variants such as the Sega Genesis instead of Megadrive, Turbografx instead of PC-Engine, and the Magnavox Odyssey instead of the Videopac.
Create a `platforms.cfg` in
```
/opt/retropie/configs/all/platforms.cfg
```
name, extensions, platform (used by es for scraping), and the theme can be overridden, see [HERE](https://github.com/RetroPie/RetroPie-Setup/blob/master/platforms.cfg) for the default _platforms.cfg_.
The following is an example of a custom _platforms.cfg_:
```
megadrive_theme="genesis"
megadrive_platform="genesis"
pcengine_theme="tg16"
pcengine_platform="tg16"
videopac_theme="odyssey2"
videopac_platform="odyssey2"
```
**Note that with any custom platforms.cfg you create you'll need to update all systems from the setup script to generate a new es_systems.cfg with your changes.**
### Controller Configs
After configuring your controller in ES, your controller configurations will be saved to:
```
~/.emulationstation/es_input.cfg
```
#### es_input.cfg edits
RetroPie uses custom generation scripts that will create the controller configurations for many emulators after going through the initial ES controller configuration. If you remove or make any modifications to this configuration, the changes will not automatically propagate to the emulators, so it's recommended that any re-configuration of the controller to be perfromed from ES's input configuration dialog.
To reset completely the controller configuration in ES, use the RetroPie-Setup script to do it, by navigating to:
_Retropie Setup ➤ Configuration/Tools ➤ emulationstation ➤ Clear / Reset EmulationStation Input Configuration_
After the reset action above is performed, restart EmulationStation or the RetroPie system and EmulationStation will start with the input cofiguration dialog, asking for a new controller to be configured.
### Scraper
There are several scrapers available in RetroPie: the built in EmulationStation scraper, Steven Selph's `scraper` and Lars Muldjord's `Skyscraper`. More information [HERE](Scraper).
The `gamelist.xml` file for a system defines metadata for a system's games, such as a name, image (like a screenshot or box art), description, release date, and rating.
ES will check three places for a `gamelist.xml` in the following order, using the first one it finds:
- `[SYSTEM_PATH]/gamelist.xml`
- `~/.emulationstation/gamelists/[SYSTEM_NAME]/gamelist.xml`
- `/etc/emulationstation/gamelists/[SYSTEM_NAME]/gamelist.xml`
An example gamelist.xml:
```xml
/home/pi/ROMs/nes/mm2.nes
Mega Man 2
Mega Man 2 is a classic NES game which follows Mega Man as he murders eight robot masters in cold blood.
~/.emulationstation/downloaded_images/nes/Mega Man 2-image.png
```
See more information [HERE](https://github.com/Aloshi/EmulationStation#gamelistxml)
#### gamelist.xml edits
If you use the built in ES Scraper your gamelist.xml and images folder will be in
- `~/.emulationstation/gamelists/[SYSTEM_NAME]/gamelist.xml`
If you use another scraper (Steven Sselph's `scraper` or Lars Muldjord's `Skyscraper`) you can choose whether your scraped data goes in
- `[SYSTEM_PATH]/gamelist.xml` (the rom folder) or
- `~/.emulationstation/gamelists/[SYSTEM_NAME]/gamelist.xml`
### Themes
The RetroPie community has developed many themes for ES. See Themes page [HERE](Themes).
ES will check two places for a theme in the following order, using the first one it finds:
- `~/.emulationstation/themes`
- `/etc/emulationstation/themes`
Themes installed from the RetroPie-Setup script will be installed in `/etc/emulationstation/themes`
See more information [HERE](https://github.com/Aloshi/EmulationStation#themes)
See here for a tutorial on [Creating Your Own EmulationStation Theme](Creating-Your-Own-EmulationStation-Theme)
#### Theme edits
Custom themes should be in `~/.emulationstation/themes`
if you want to make custom themes or edit an existing theme:
First make a themes directory if it doesn't exist
```
mkdir ~/.emulationstation/themes
```
add your theme to the themes folder or if you are copying an existing theme to edit, we'll use carbon as an example:
```
cp -R /etc/emulationstation/themes/carbon ~/.emulationstation/themes/carbon_custom
```
### Scripting
EmulationStation supports calling external scripts and executables on certain program events.
#### 1. The scripts directory
First, create a new directory called scripts inside the config directory:
Linux (as user `pi`): `mkdir ~/.emulationstation/scripts`
#### 2. Event directories
Inside the scripts folder, create a new directory for the kind of event you want to script:
| Name | When | Arguments (max. 4) |
|:--------------------|:--------------------------------------------------------------------------|:----------------------------|
| `quit` | on program quit | `%quit_mode%` |
| `reboot` | on system reboot (also calls quit first) | |
| `shutdown` | on system shutdown (also calls quit first) | |
| `config-changed` | on the change of any configuration option | |
| `controls-changed` | on change of the control settings (also calls config first) | |
| `settings-changed` | on change of the regular (non-control) settings (also calls config first) | |
| `theme-changed` | on change of theme (also calls settings-changed after) | `%new_theme%` `%old_theme%` |
| `game-start` | before starting a game | `%rom_path%` `%rom_name%` `%game_name%` |
| `game-end` | after finishing a game | |
| `sleep` | station is without user input for more than `systemSleepTime` | see note 1. |
| `wake` | station returns from sleep (i.e. user input) | see note 1. |
| `screensaver-start` | after screensaver starts | |
| `screensaver-stop` | after screensaver stops | |
| `screensaver-game-select` | screensaver is displaying the media for a game | `%system_name%` `%rom_path%` `%game_name%` `%media%`
see note 2. |
| `system-select` | after a system is selected | `%system_name%` `%access_type%`
see note 3. |
| `game-select` | after a game is selected in the gamelist | `%system_name%` `%rom_path%` `%game_name%` `%access_type%`
see note 4. |
**Notes**
1. **sleep/wake** use no arguments.
`systemSleepTime` is usually after `screenSaverTime` (both editable in the Screensaver Menu). A value of `0` disables sleep and the screensaver respectively.
2. **%media%** is one of:
* `randomvideo`: a video is played when screensaver is set to _Random Video_
* `slideshow`: a picture is displayed when screensaver is set to _Slideshow_
3. **%access_type%** is one of:
* `gotostart`: when EmulationStation is set to start on a certain system and the system is opened on startup
* `input`: when the system is selected in the carousel
4. **%access_type%** is one of:
* `requestedgame`: when EmulationStation is set to start on a certain system and the game is selected after startup
* `input`: when the game is selected while browsing a system's gamelist
`%system_name%`, `%system_path%` and `%game_name%` will be set to **NULL** (literal string) when there are no games in the system
#### 3. Script calling
Put your executable scripts or binaries into these new directories. They will be called in alphabetic order when the event happens.
### Command Line Arguments
EmulationStation has a few command line arguments that could be helpful to you for various customisation. Let's say you wanted to setup a kiosk but did not want to give access to the builtin scraper function or you didn't want the end user to be able to exit EmulationStation, you can simply edit `/opt/retropie/configs/all/autostart.sh` and append the corresponding command line argument.
For example, to disable the Exit option from inside the Quit menu, edit `/opt/retropie/configs/all/autostart.sh` with
```
emulationstation --no-exit #auto
```
To see a complete list of the supported command line arguments
```
emulationstation --help
```
### Alternative Frontends
Because of the development hiatus, there has been some attention towards other front-ends. The following alternate frontends can be installed from experimental packages of the RetroPie Setup-Script but support is currently only preliminary.
- Attract-Mode ([site](http://attractmode.org/))
- mehstation ([site](https://remy.io/mehstation))
- Pegasus ([site](https://pegasus-frontend.org/))