 retropie
#Dreamcast

The Sega Dreamcast is a 6th generation home video game console released by Sega in 1998. It is notably the last console that Sega produced.
| Emulator | Rom Folder | Extension | BIOS | Controller Config |
|---|---|---|---|---|
| Reicast | dreamcast | .cdi .chd .gdi | dc_boot.bin, dc_flash.bin | /opt/retropie/configs/dreamcast/mappings |
| lr-flycast | dreamcast | .cue .cdi .chd .gdi .m3u .zip | dc_boot.bin, dc_flash.bin | /opt/retropie/configs/dreamcast/retroarch.cfg |
| Redream | dreamcast | .cue .cdi .chd .gdi | boot.bin (optional) | /opt/retropie/configs/dreamcast/redream/mappings |
| lr-flycast-dev | dreamcast,arcade | .cue .cdi .chd .gdi .m3u .zip | dc_boot.bin | /opt/retropie/configs/dreamcast/retroarch.cfg |
| Flycast | dreamcast,arcade | .cue .cdi .chd .gdi .m3u .zip | dc_boot.bin | /opt/retropie/configs/dreamcast/mappings |
Emulators
-
Reicast can be very laggy and buggy, but it's useful for older (Pi2/Pi3) systems. Audio is choppy and not great, and degrades the longer the emulator is in use. Restarting the emulator (and ultimately the Pi) may become a good idea after a couple hours of gameplay. There is a memory leak somewhere in the Reicast code. Low screen resolution are recommended to get best performance. Performance greatly suffers if HD resolutions are used.
-
lr-flycast can be found in the Optional packages section and is recommended for the libretro integration, having also better peformance than Reicast on Pi4+ platforms.
NOTE: this core is using an older and un-maintained version of Flycast, suitable for older RaspiOS versions. For newer RaspiOS (Bookworm and later), the lr-flycast-dev core is recommended. -
Redream can be found in the Experimental packages section and runs the best of the three options. However it can only be run on a Pi4 or a 64bit PC system, due to the OpenGL(ES)3 requirement.
-
lr-flycast-dev can be found in the Experimental packages section and it's the currently maintained libretro core from the Flycast. Recommended for recent systems and RaspiOS versions and better support for Naomi/Atomiswave games.
-
Flycast standalone emulator can be found in the Optional packages section. It uses the same codebase as the lr-flycast-dev core, but with it's own interface and menu. It can be used as an alternative to the libretro core for weaker systems or when trying to squeeze more performance out of the emulator.
ROMS
Accepted File Extensions: .cue .cdi .chd .gdi for Dreamcast games, .zip for Naomi/Atomiswave arcade games.
Place your game files in
/home/pi/RetroPie/roms/dreamcast
Optionally, the Naomi/Atomiswave arcade ROMs can be added to
/home/pi/RetroPie/roms/arcade
and the Flycast emulator (standalone or the libretro core) can be chosen to run the specific ROMs from the Runcommand Launch Menu.
CHD files
All three emulators have support for the CHD (V5) archive format. This format will save space and allow you to keep your Dreamcast ROM folder tidy. See Creating CHDs from CD-ROMS.
BIOS
The BIOS files needed are: dc_boot.bin, dc_flash.bin. The boot file is often found named something else, such as dc_bios.bin. It must be renamed to dc_boot.bin when placed in the BIOS folder. lr-flycast has support for the Sega Naomi and Atomiswave arcade systems but you will also need the corresponding BIOS from the MAME romset.
Place your BIOS files in
/home/pi/RetroPie/BIOS/dc
BIOS files
| File | Region | md5sum | CRC32 | Comment |
|---|---|---|---|---|
| dc_boot.bin | World | e10c53c2f8b90bab96ead2d368858623 | 89f2b1a1 | |
| dc_flash.bin | USA | 0a93f7940c455905bea6e392dfde92a4 | c611b498 | |
| dc_flash.bin | Europe | 23df18aa53c8b30784cd9a84e061d008 | b7e5aeeb | |
| dc_flash.bin | Japan | 69c036adfca4ebea0b0c6fa4acfc8538 | 5f92bf76 | |
| dc_boot.bin | Free | d407fcf70b56acb84b8c77c93b0e5327 | 61d5613f | Hack |
| dc_flash.bin | Free | 93a9766f14159b403178ac77417c6b68 | e0d202a2 | Hack |
| dc_boot.bin | Free | d552d8b577faa079e580659cd3517f86 | 558f456e | atreyu187 Hack |
| dc_flash.bin | Free | 74e3f69c2bb92bc1fc5d9a53dcf6ffe2 | bda0e9aa | atreyu187 Hack |
| naomi.zip | World | eb4099aeb42ef089cfe94f8fe95e51f6 | c295a8c2 | NAOMI BIOS |
| awbios.zip | World | 0ec5ae5b5a5c4959fa8b43fcf8687f7c | ab628024 | Atomiswave BIOS |
Note: If you are having trouble with having to set the date/time every time you load Reicast, see this forum post for a guide on how to replace dc_flash.bin. The MD5 of the dc_flash.bin generated from that guide should be 2f818338f47701c606ade664a3e16a8a.
Note: As of February 2019, the date/time prompt should appear only the 1st time Reicast is started.
Video Setup Guide
RetroPie 4.0 uses an output resolution independent render resolution of 640x480. Open /home/pi/.reicast/emu.cfg to modify render resolution.
Tweaks
/opt/retropie/configs/all/autoconf.cfg
| Option | Description | Value |
|---|---|---|
| reicast_input | enable input auto configuration | (0/1) |
VMUs
Reicast
VMUs are stored as .BIN files under /home/pi/.reicast/, and will be automatically created the first time you run Reicast without VMU files.
On occasion, these VMUs do not get formatted quite right during creation, and the Dreamcast can't save or load data from them. They just need to be reformatted -- run the SYSTEMMANAGER entry in the EmulationStation Dreamcast menu and / or see this post for details.
Flycast (all versions)
VMUs are stored as .BIN files under /home/pi/RetroPie/BIOS/dc/, and will be automatically created on the emulator's first run.
There is an option for the core to enable per-game VMU's. This option is recommended if you have several games or a game that takes a large amount of space.
Redream
VMUs are stored as vmu[0-3].bin files under /opt/retropie/configs/dreamcast/redream/.
Management
A Dreamcast soft-reset (A+B+X+Y+Start buttons at the same time) at the ROM's title screen will also take you into the Dreamcast BIOS to manage the VMU's. After formatting VMU's, exit the emulator and restart if using Reicast. Pressing 'Play' will cause Reicast to crash.
Controls
Controls for the Dreamcast emulators - except Redream - are automatically configured when you configure your controls through EmulationStation. Please notice that you may be interested in disabling the input auto config (described above) in case of any autoconfig issue for Redream.
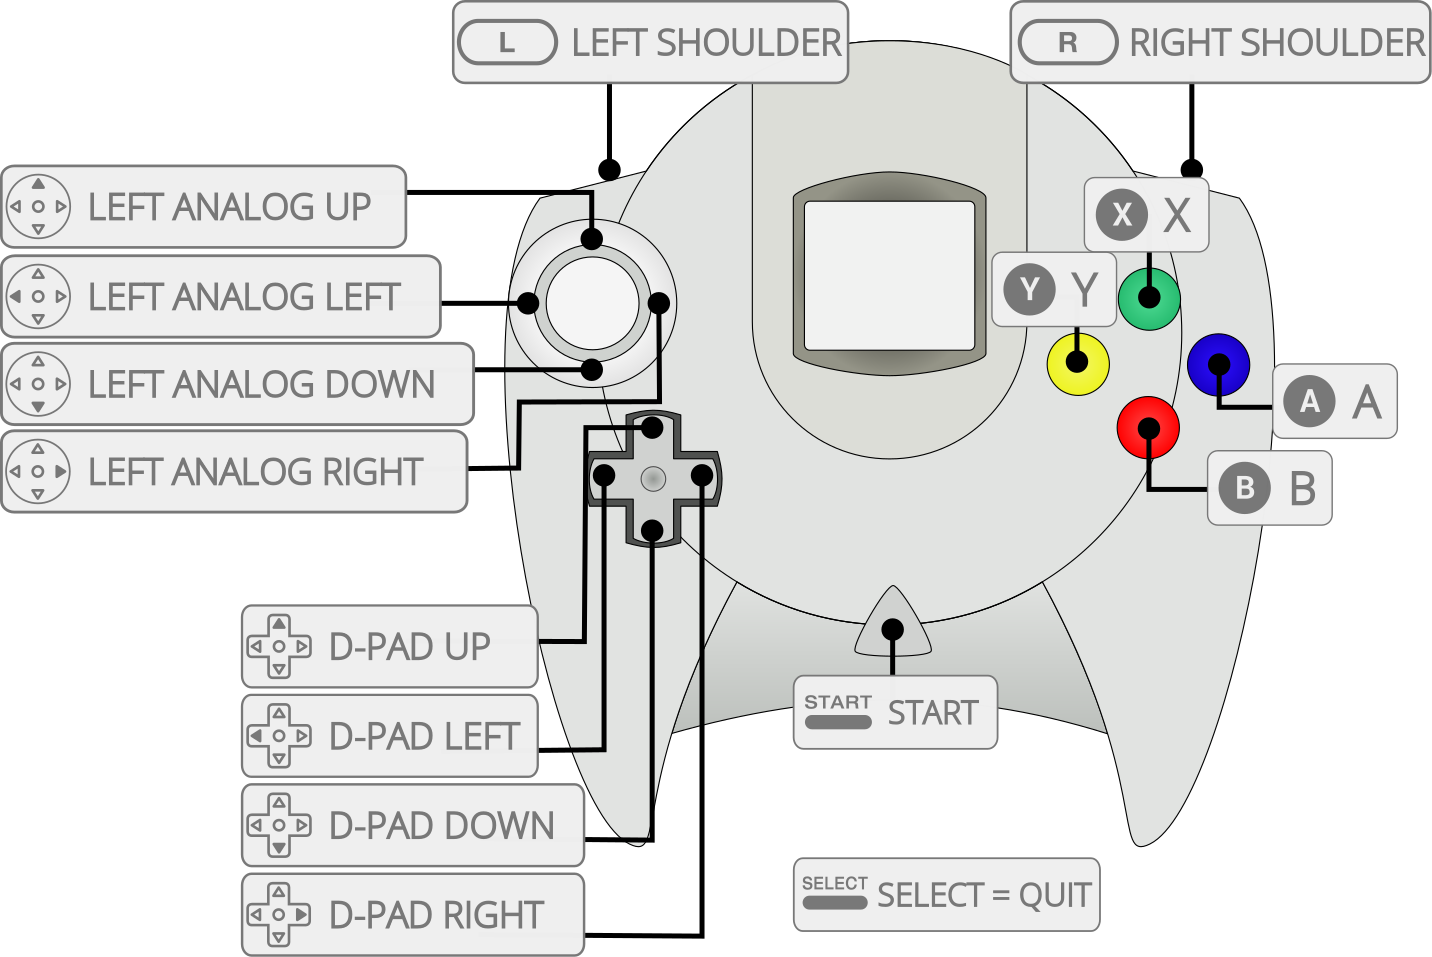
Reicast
Controls can be mapped via the /home/pi/.reicast/emu.cfg file. Make sure that evdev_device_id_1 and evdev_device_id_2 entries are set to the corresponding controller's /dev/input/event* number you want to use. A -1 means no controller, which we will use for player 3 and 4. Then have evdev_mapping_1 & evdev_mapping_2 entries point to the matching controller mapping configuration files and both can either point to the same file or different files if you want to use 2 different controllers types.
Here is an example of this:
[input]
evdev_device_id_1 = 2
evdev_device_id_2 = 3
evdev_device_id_3 = -1
evdev_device_id_4 = -1
evdev_mapping_1 = /opt/retropie/configs/dreamcast/mappings/controller_Xbox360WirelessReceiver(XBOX).cfg
evdev_mapping_2 = /opt/retropie/configs/dreamcast/mappings/controller_8BitdoSNES30GamePad.cfg
joystick_device_id = -1
If you want to be able to use 2 controllers at the same time, then you would add this section to the emu.cfg file:
[players]
nb = 2
Using the +Start Reicast script launches the game menu with a Settings button. Controllers can be mapped directly from ths settings menu - this creates config files looking like:
/opt/retropie/configs/dreamcast/mappings/evdev_Xbox360WirelessReceiver(XBOX).cfg
In stock configuration, access to this menu is controlled from the D-Pad of a controller with an analog stick. In the case where your controller does not have an analog stick, it may be necessary to connect one in order to access this part of the menu and create mappings for your other controllers.
Some example mappings are provided below for various controllers which can be directly edited from the
/opt/retropie/configs/dreamcast/mappings/
Folder listed above.
An example mapping for a PS3 controller is below for reference:
PlayStation 3 Controller
[PLAYSTATION(R)3 Controller]
button.0=Btn_Z
button.1=Btn_C
button.2=Btn_D
button.3=Btn_Start
button.4=DPad_Up
button.5=DPad_Right
button.6=DPad_Down
button.7=DPad_Left
button.8=Axis_LT
button.9=Axis_RT
button.10=DPad2_Left
button.11=DPad2_Right
button.12=Btn_Y
button.13=Btn_B
button.14=Btn_A
button.15=Btn_X
button.16=Quit
axis.0=Axis_X
axis.1=Axis_Y
Xbox 360 Controller:
[emulator]
mapping_name = Xbox Gamepad (userspace driver)
btn_escape = 0x13a

[dreamcast]
btn_a = 0x130h
btn_b = 0x131h
btn_c =
btn_d = 0x139h
btn_x = 0x133h
btn_y = 0x134h
btn_z = 0x138h
btn_start = 0x13Bh
axis_x = 0x00
axis_y = 0x01
axis_trigger_left = 0x0a
axis_trigger_right = 0x09

[compat]
axis_dpad1_x = 0x10
axis_dpad1_y = 0x11
Xbox 360 Wireless Controller using xpad driver:
[emulator]
mapping_name = Xbox 360 Wireless Receiver (XBOX)
btn_escape = 316

[dreamcast]
btn_a = 304
btn_b = 305
btn_c =
btn_d =
btn_x = 307
btn_y = 308
btn_z =
btn_start = 315
btn_dpad1_left =
btn_dpad1_right =
btn_dpad1_up = 704
btn_dpad1_down = 707
btn_dpad2_left =
btn_dpad2_right =
btn_dpad2_up =
btn_dpad2_down =
axis_x = 0
axis_y = 1
axis_trigger_left = 10
axis_trigger_right = 9

[compat]
btn_trigger_left = 312
btn_trigger_right = 313
axis_dpad1_x = 16
axis_dpad1_y = 17
axis_dpad2_x =
axis_dpad2_y =
axis_x_inverted = no
axis_y_inverted = no
axis_trigger_left_inverted =
axis_trigger_right_inverted =
axis_dpad1_y_inverted = no
axis_dpad1_x_inverted = no
PS4 Controller
[emulator]
mapping_name = Sony Computer Entertainment Wireless Controller
btn_escape = 316

[dreamcast]
btn_a = 305
btn_b = 306
btn_x = 304
btn_y = 307
btn_start = 313
axis_x = 0
axis_y = 1
axis_trigger_left = 3
axis_trigger_right = 4

[compat]
axis_dpad1_x = 16
axis_dpad1_y = 17
axis_x_inverted = no
axis_y_inverted = no
axis_trigger_left_inverted = no
axis_trigger_right_inverted = no
axis_dpad1_y_inverted = no
axis_dpad1_x_inverted = no
Akishop Ps 360+ Joystick
[emulator]
mapping_name = Akishop Customs PS360+ v1.66
btn_escape = 316

[dreamcast]
btn_a = 306
btn_b = 305
btn_x = 307
btn_y = 304
btn_start = 312

[compat]
axis_dpad1_x = 16
axis_dpad1_x_inverted = no
axis_dpad1_y = 17
axis_dpad1_y_inverted = no
btn_trigger_left = 309
btn_trigger_right = 311
8Bitdo NES30 Pro
Open the configuration file using a text editor, e.g.:
sudo nano /opt/retropie/configs/dreamcast/mappings/controller_8BitdoNES30Pro.cfg
The content of the file should look like this:
[emulator]
mapping_name = 8Bitdo NES30 Pro
btn_escape = 314

[dreamcast]
btn_a = 304
btn_b = 305
btn_c =
btn_d =
btn_x = 307
btn_y = 308
btn_z =
btn_start = 315
btn_dpad1_left =
btn_dpad1_right =
btn_dpad1_up =
btn_dpad1_down =
btn_dpad2_left =
btn_dpad2_right =
btn_dpad2_up =
btn_dpad2_down =
axis_x = 0
axis_y = 1
axis_trigger_left = 24
axis_trigger_right =

[compat]
btn_trigger_left = 310
btn_trigger_right = 311
axis_dpad1_x = 16
axis_dpad1_y = 17
axis_dpad2_x =
axis_dpad2_y =
axis_x_inverted = no
axis_y_inverted = no
axis_trigger_left_inverted =
axis_trigger_right_inverted =
axis_dpad1_y_inverted = no
axis_dpad1_x_inverted = no
iBuffalo Classic USB GamePad
Analog movement not supported
[emulator]
mapping_name = USB,2-axis 8-button gamepad
btn_escape = 294

[dreamcast]
btn_a = 288
btn_b = 289
btn_x = 290
btn_y = 291
btn_start = 295
axis_x = 0
axis_y = 1

[compat]
btn_trigger_left = 292
btn_trigger_right = 293
axis_x_inverted = no
axis_y_inverted = no
Mobile Gamepad
[emulator]
mapping_name = MobileGamePad
btn_escape = 0x13a

[dreamcast]
btn_a = 0x130
btn_b = 0x131
btn_c = 0x136
btn_d = 0x137
btn_x = 0x133
btn_y = 0x134
btn_z =
btn_start = 0x13b
btn_dpad1_left =
btn_dpad1_right =
btn_dpad1_up =
btn_dpad1_down =
btn_dpad2_left =
btn_dpad2_right =
btn_dpad2_up =
btn_dpad2_down =
axis_x = 0x00
axis_y = 0x01
axis_trigger_left =
axis_trigger_right =

[compat]
btn_trigger_left = 0x138
btn_trigger_right = 0x139
axis_dpad1_x =
axis_dpad1_y =
axis_dpad2_x =
axis_dpad2_y =
axis_x_inverted = no
axis_y_inverted = no
axis_trigger_left_inverted =
axis_trigger_right_inverted =
Mapping a Nonstandard Controller
For Reicast, if the controller mapping produced by EmulationStation is not correct, then a semi-manual configuration tool is provided by the emulator, which can be started from the RetroPie system, by opening the RetroPie-Setup script and then navigating to Configuration / tools -> reicat. Start the input mapping script, choose the controller that needs to be configured and then - one by one - map each input on the gamepad.
The script will create the necessary .cfg file, similar to the examples given above, in the right location.
Flycast (standalone)
Mapping a controller can be done after starting a game, by opening the emulator menu with the Tab key. If the gamepad has a dedicated buttons like Home/Guide/PS button, that button may work also to open the emulator's menu.
Note: navigating between the settings menu tabs can be done through the LT/RT button (shoulder buttons) on a gamepad. When using a keyboard, navigating between tabs can be done by using positioning the cursor on tabs title line, using the left/right arrow keys to select a tab and then pressing Space or Enter to activate the tab.
Copyright the RetroPie project and its contributors. Distributed under the upstream GPLv3 license, with original notices retained.
Adapted for this site's presentation: sanitized HTML, local links, heading anchors, and external illustration links. Original Markdown · Pinned upstream source · Upstream website